
Now that you've got a good spot picked out and your hive is all assembled, you're ready to go. There's only one last step holding you back from breaking your bee fever and becoming a beekeeper - owning a colony of bees.
There are many ways to get a hold of your first colony of bees. You could get your bees for free by finding or baiting a swarm. If you have the right connections, you could split your own off from an existing hive. But, by far the easiest and most assured way is to reserve a Nuc or a package of bees for Early Spring.
If you're looking for the short answer, we recommend you buy a 5 Frame Nuc. If possible, make sure the beekeeper is local and that the queen you receive has been overwintered. To learn why this is the best decision and about the cheaper options, keep reading this article.
Table of Contents (Click to Skip Around)

Finding a Swarm
The hardest part about finding and catching a swarm is actually finding them. Once you've found them though, it's really not too difficult to retrieve them, take them home, and install them into your own beehive.
When bees swarm, it means they've left their old hive in a mass exodus. They've taken about a third to half of all the bees with them as well as the old queen. Bees that swarm don't have a permanent home and tend to be much more docile and gentle than any other kind. They generally aren't aggressive because they don't have to protect their honey or their home. Although you probably won't get stung while trying to catch a swarm, we would still recommend wearing a bee suit to calm your nerves if this is your first time.
Why Do Bees Swarm?
A swarm happens when the worker bees of a colony decide that the hive is getting too crowded. When this happens the worker bees elect a new queen by turning an uncapped brood cell into a queen cell. A few days before the new queen hatches, the old queen and her companions swarm away from the hive. After leaving the beehive, the swarm then lands somewhere nearby. The act of swarming like this is the natural way that colonies reproduce into more colonies. Strong colonies can split like this 2 to 3 times a year.
Once the colony has left the bee hive, it is called a "swarm". After it lands, the swarm sends out scout bees to scope out a new permanent home for the colony. While the scouts are looking for a permanent home, beekeepers want to try to rescue the hive while they're still out in the open.
How to Find a Swarm
Finding a swarm takes quite a bit of luck on your own. Knowing people that own land can be helpful. If you don't know anyone, you can put a Facebook Post out or call around to local farms to let it be known that you are looking for a swarm. In the post or call you should mention that you would come and remove the swarm from their property for free and that if someone sees a swarm they should get ahold of you.
Another step you could take would be to put your name on to your county's swarm list. When you're on the swarm list, people will call you for swarm help. To get on the swarm list, just type "Your County's Name Bee Swarm List" into Google and a registration should be one of the first results. If you can't find it, then call your local bee association and ask them how you would get on one.
Bee swarms can be found on just about anything -- street lamps, benches, swings, mailboxes, fence posts, cars, or light fixtures. The bees really don't discriminate where their initial landing is, but they are most often found on tree limbs and usually within 100 yards of their original home.

How to Catch a Swarm
To catch a swarm, you'll want a lightweight cardboard or plastic box that you can cover with a towel. The towel will keep the bees in while allowing air to travel into the box, so you don't need to puncture your box with holes first. You'll likely want your bee suit and gloves on to calm your nerves. You may want to bring a saw or pruners because sometimes it's easier to just cut off the tree limb that they're hanging from.
Once you're at the swarm location, your goal is to make sure the queen gets into your box unharmed. If she does make it in to the box, then all the other bees will follow her into it. In fact, even if you're not skilled enough to spot the queen, that's okay. You'll know she's in your box if all the bees start congregating in and around your box instead of their original position. Another sign you've caught the queen would be if you see a bee fanning (flapping her wings while standing on an edge) the queen's pheromone to let the others know their location.
Most people will shake the tree limb until the bees come off and fall into their box. If shaking is not an option you may need to scoop them with your gloves on. There are many ways to get the bees into the box, so think creatively if you have to.
Cautions
- Finding a swarm is difficult and unreliable, many beekeepers don't get called to retrieve a swarm in their first years
- There are times that swarms are in spots that make them irretrievable, i.e. in a wall, inside a lamp post, or in a tree hollow
- Sometimes people don't know the difference between wasps and bees. Don't be surprised if you show up to a swarm location and they aren't what you were hoping for
Baiting a Swarm
Baiting a swarm is very similar to finding a swarm. It can be a little more difficult to do, costs a little more in materials, and takes just as much luck to result in obtaining a swarm. After you're all set up though, it takes very little effort, you don't have to leave your property to catch a swarm, your bait box should last for years, it's passive & ongoing throughout the swarming months, and could catch multiple swarms given enough time.
The major difference between finding and catching a swarm is that instead of finding the swarm while they're between homes, you're trying to convince the scout bees that your bait box should be the permanent home that is best for their colony.
To do this, you'll have to make a nice home for them in a nice location. Here is a short list of things you should consider while baiting a swarm:

Where to Bait a Swarm
Wild bee swarms prefer to be in the shade. Swarms frequently choose to live in a tree on the edge of a forest somewhere. They choose forest edges because they can be shielded from the sun while still easily harvesting from flowers and fields that are in the sun. When choosing a spot for your bait box, you should consider a tree on the edge of a forest or tree line. You'll also want to place your bait box about 20 feet up the tree.
If you don't own a tree, you can still bait by nailing your box to the side of a shed or even have the box on the ground if necessary. Just be sure to use a good amount of bait.
While the bees may prefer to swarm to the shade, beekeepers on the other hand, prefer to keep their bees in the sun for many reasons. For more on why, see our article: How Much Sun Do Your Bees Need?
Necessary Materials to Bait a Swarm
Bees are looking for the right size hollow for their new hive. As far as bait boxes go, this could be a container that would hold about 10 to 20 Gallons (40 Liters to 75 liters) of liquid. For a size comparison, the ten-frame Langstroth deep brood box you purchased holds 11.5 Gallons (43 Liters).
In inches, bait boxes are usually 8" (20.32 cm) wide by 19.875" (50.48 cm) Long by 16.25" (41.27 cm) Tall.
Types of Bait (Recommended)
- Bait 1: Lemongrass Oil - Bees love lemon grass like cats love catnip. Drip a few drops on to the inside of your bee box and your chances will increase drastically. The reason behind attracting bees with Lemongrass oil is due to how similar it is to a queen's pheromones
- Bait 2: Drawn Frames - Bees are attracted to frames that already have beeswax on it. They know that it is easier to start a hive from drawn comb. If bees find beeswax in a hollow, they also know that at some point it was safe for another hive to have lived there
- Bait 3: Charred Wood - There is still some controversy to this method, but some beekeepers swear that bees like charred wood. These beekeepers scorch a side of their bait box to attract bees. The reason behind this is related to how lightning chars the hollows of trees. So bees are attracted to the smell
Cautions
- By doing any or all of these, there is still no guarantee that you'll catch a swarm. It just increases your odds
- Don't forget to check your bait boxes every now and then, especially during swarm season
Splitting a Hive
To split a hive, you have to know someone who has a hive. Therein lies the difficulty.
This option can be free if you know a beekeeper who is willing to give you some eggs to start your own. Most of us aren't so lucky though.
How to Split 1 Hive into 3
If you're new to beekeeping this might be a bit over your head, but here is how to split one hive into three:
- First you'll inspect your hive to make sure it still has a queen and she hasn't swarmed away
- While inspecting each frame, look for the queen and count how many queen cells that have eggs in them
- Also count how many frames have uncapped brood
- Once you find the queen you'll know that your hive has not swarmed recently
- Next you'll take your queen and two frames of capped brood and put it into a Nuc box (5 frame hive) with 3 other empty frames
Cautions
- Splitting a hive is often seen as an advanced technique and takes someone who knows what they are doing
- Moving deep frames that have a queen or queen cells can possibly result in a squished queen or queen cell. Make sure to have ample room when transporting and inserting your frames with a queen or queen cells on them
- There is a small chance that your uncapped brood doesn't advance into queen cells. If your uncapped brood cells are older than 3 days old when you are splitting, it is possible that they have all changed their diet from royal jelly over to bee bread. Within the first 3 days of being laid, a bee is inside of an egg (looks like a grain of rice). After 3 days, the egg within the cell hatches and enters into the larval stage. Bees starts off eating Royal Jelly when it's in the larval stage. This Royal Jelly diet can continue on for up to 0 - 3 days, but then is ultimately switched to bee bread. Once your brood's diet contains bee bread (a mixture of pollen, nectar, and saliva) the brood becomes infertile and can't turn into a queen
- Splitting a hive into three hives is ambitious, you may have to reduce your splits back down to 1 or 2 hives if the queens don't start laying eggs
- Sometimes when splitting into 3 hives, the bees tend to condense themselves back into one or two hives. You might have to move them further away from each other
Buying a Package
This is the first option on the list that you'd have to purchase.
Ordering a package of bees, should ensure that you'll receive your bees this year (unless the apiary you choose fails to fulfill the order).

What You'll Receive in a Package
A package of bees usually comes in a wooden box that is about the size of a shoe box. This box holds 3 pounds of worker bees, a queen in a queen cage, and a can of sugar syrup for the bees to eat while traveling by mail or car.
Before being placed in her queen cage, the queen has already mated and is ready to lay eggs. The queen you receive has never met the worker bees that you get in your package. Which means, the worker bees have not adapted to the queen's pheromone yet. For this reason, the queen has to be separated and put into a queen cage. The queen cage keeps your queen safe as the worker bees start to adapt to her pheromone. If she wasn't placed into her own separate cage, the worker bees would reject and likely kill her.
On average it takes about 4 days for the worker bees to adapt to the queen's pheromone. So beekeepers have created an ingenious way to make sure your queen is safe and released in a timely manner. They've plugged the entrance to the queen cage with hard candy and a cork. The few worker bees that are in the queen cage with the queen will eat the hard candy. During this time, they'll turn the hard candy into Royal Jelly for the queen to eat. While they are eating into the hard candy they're also making a pathway out of the cage.
It takes about 4 days for the worker bees within the queen cage to chew all the way through the supplied candy. This is on purpose. You should never remove or poke a hole through this hard candy within the first week of getting your package. If after one week, the candy has not been chewed through, then you can help them out and remove it manually.
During this week long chewing, there are few things that are happening:
- The worker bees are getting accustomed to the pheromone of their new queen
- The worker bees have time to start making wax while the queen is preoccupied
- The worker bees can't swarm away because the queen can't leave
- The worker bees are starting to orient themselves to their new beehive, the surrounding area and the food sources around them

Once the queen is free from her cage, she will explore her new beehive while spreading her pheromone everywhere. After a few days of spreading her pheromone, she will get to work by laying eggs.
How to Install a Package of Bees
- Once you've prepared your hive and received your package of bees you'll want to remove the queen cage. To do so, you have to temporarily remove the lid and remove the can of syrup from the package. This will release a few worker bees, but they'll stay nearby
- After removing the queen cage, place the package's lid back onto the package entrance hole to prevent other bees from escaping
- Remove the queen cage's cork with a knife or by screwing a screw into the cork and pulling it out. If there is no hard sugar blocking the queen cage's entrance; plug the entrance with a marshmallow so the queen can't leave her cage yet

- To do this, you'll remove the package's lid, and take the box and bump it on the ground. This loosens the bees from holding onto the mesh screen of the package's box
- Once you've bumped the package, then you can dump the rest of the bees out of the entrance hole directly into the hive
- Once the bees our mostly removed from the package (there will be some stragglers) then slowly place the two frames back into the hive and put the inner cover & telescoping top cover onto the hive box.
Although buying a package is a solid plan, there is a negative to doing so. By purchasing a package of bees, your bees will be starting from scratch. The bees will have to draw out every single frame of honey comb by themselves. This can take some time so that means that bees are less likely to start producing brood and honey immediately. They need to first build up their home and then they can start filling in the comb that they made.
Cautions
- Although buying a package is a solid plan, there is a negative compared to the next option on the list - Buying a Nuc. By purchasing a package of bees, your bees will be starting from scratch. The bees will have to draw out every single frame of honey comb by themselves. This can take some time. This means that your bees are less likely to start producing brood and honey immediately. They need to first build up their home and then they can start filling in the comb that they have made. You can help them build their wax quicker by feeding them 1 to 1 Sugar Syrup.
- Buying a package is not difficult, but there is a small risk that your bees will still swarm away before calling their new hive their new home. You'll know that your hive is there to stay once your queen is laying eggs in the freshly made comb
- Sometimes after installing a package, the queen doesn't lay eggs quick enough and the nurse bees start to form queen cells because they think something is wrong with your queen. To fix this, you'll need to squeeze the queen cells after first checking if the queen is still in the hive. You can also add a frame of brood cells to your beehive and/or feed the hive some pollen patties to help provoke the queen to lay faster. Your queen should come marked, but if she isn't, marking the queen with a POSCA Paint Pen will help you find her while inspecting
- Many beekeepers want to check on their new beehives obsessively. Instead, you should only check on day 4 after installing your hive to make sure the queen has made it out of her cage. Also check on day 10 to make sure she is laying, remove the queen excluder, find her busy at work, and if necessary kill the queen cells being produced. After 2-3 weeks, your beehive will be fine to check whenever you'd like
Buying a Nuc
The last option on the list is to purchase something called a Nuc. This is the least risky way of obtaining your bees and is what we recommend for all first year beekeepers to do.
What You'll Receive in a Nuc
Nucs, short for Nucleus, come with 5 drawn out frames that are full of brood, a queen, and a few pounds of bees.
Buying a Nuc means that you're buying an already established miniature hive.
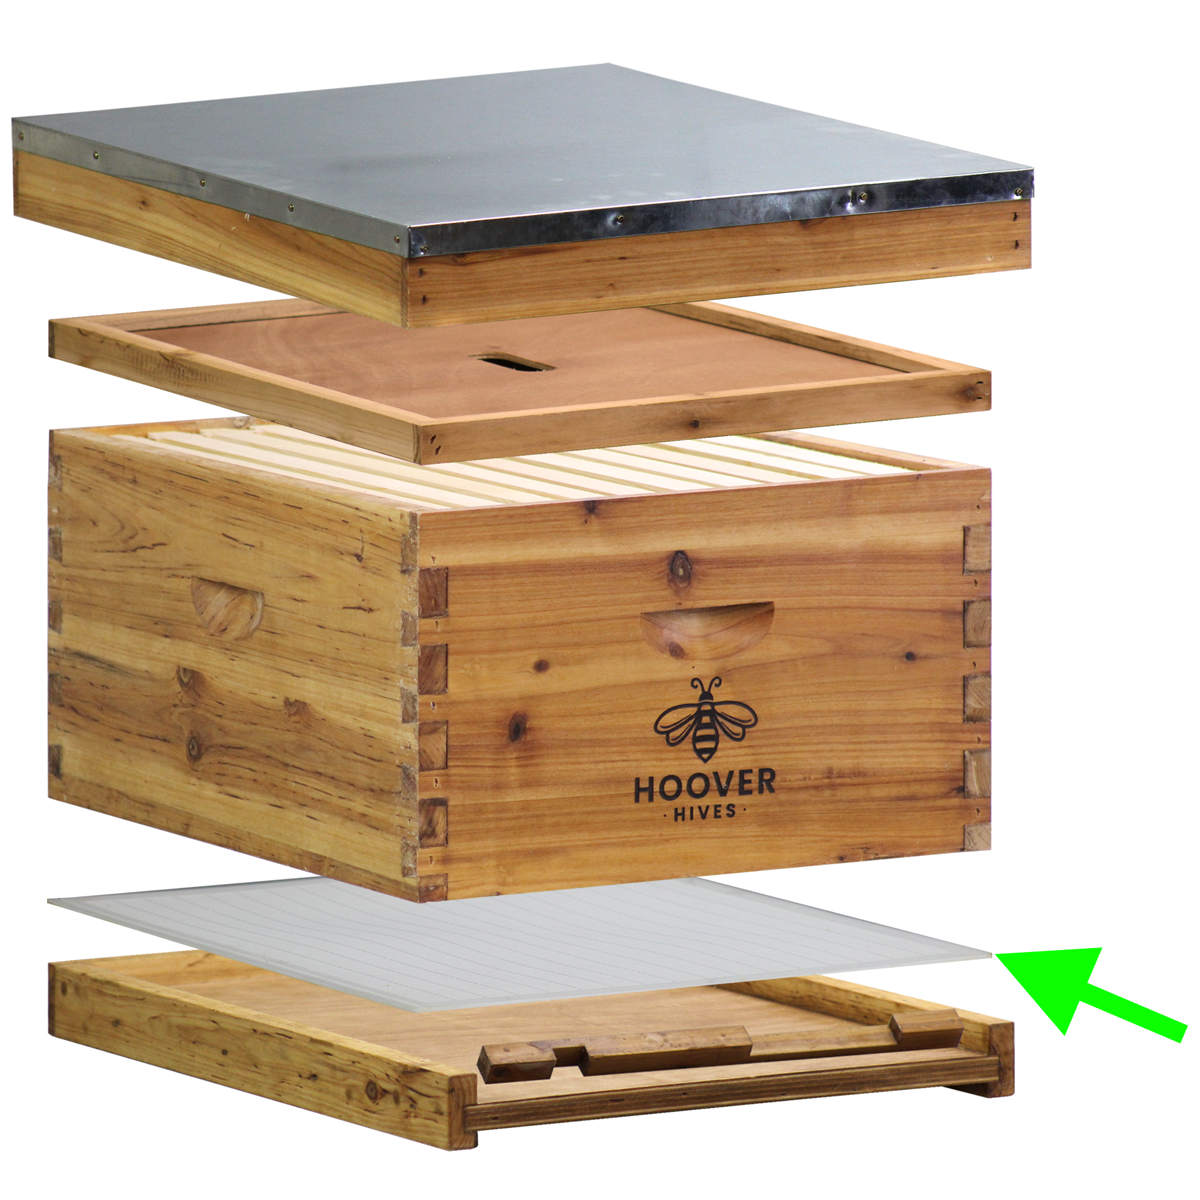
The most common way that Nucs are sold are in 5 frame increments. See picture
With 5 frames, your bees will have the best head start to building a healthy hive and could possibly give you your first taste of your own honey in the first year. You can also purchase 4 or even 3 frame Nucs, but we recommend seeking out a 5 frame Nuc.
Nucs come with pre-established frames that have a queen that is already laying brood. The frames should contain both capped brood that is about to hatch and fresh uncapped brood that the queen recently laid.

Buying a Nuc takes all the negatives and risk out of purchasing a package of bees, but can be a little more expensive. With a Nuc, your queen has already started laying brood, which means there is almost no risk of her and her worker bees swarming away.
They'll quickly adapt to their new setting and soon enough you'll be ready to add on your second bee box.
How to Install a 5 Frame Nuc
- First you'll assemble and prepare your beehive. To do so, take off your telescoping top cover and inner cover so you can remove 5 of the CellTech Frames from your 10 frame hive set up.
- Next open the lid of your 5 Frame Nuc. Bees will fly out, but they'll stay nearby
- Then remove each frame from the 5 Frame Nuc one by one, inspecting each frame for the queen. Be careful to remove your frames slowly so that you do not harm her while you are pulling your frames out of the Nuc. The queen should be marked with a paint pen so she should be easy to find even for new beekeepers
- As you remove the frames from the 5 Frame Nuc, place each frame into the center of your new hive in the same order that you received them in your Nuc
Save Money
To save money, we recommend you purchase one of our Starter Hive Kits. Each kit is Nuc Ready and only comes with 5 frames instead of making you pay for 10. The starter kits also come with all the accessories you'll need for your first few years of beekeeping.


Pro Tip
Whether you decide to purchase a 5 Frame Nuc or a package of bees, nearly every beekeeper in the world would recommend that you buy your bees from a local source and, if you can, have them overwintered.
Buying local means that your bees have already adapted to the local environment's, climate, pollen, and nectar. They'll know exactly what should be considered food and will start harvesting pollen and nectar quickly.
Making sure that your queen has been overwintered will help your bees survive the winter in your local climate. This is very important - especially since some bees are more susceptible to the cold than others. This will give your bees the best fighting chance.
In Conclusion
You are awesome for considering becoming a beekeeper!
There are many ways to obtain your first bees.
Maybe you'll get lucky enough to find or bait a swarm, but a first year beekeeper probably does not want to rely on these options.
Finding a swarm can be difficult and it'd be best to put yourself on the swarm list.
Baiting a swarm can be a passive and ongoing way to try to catch more bees. This is a great idea, but can't be heavily relied on.
Splitting a hive is a great option if you know someone willing to help you get started. Most of us aren't so lucky though.
Ordering your bees is by far the most reliable option to making sure you get bees in your first year. Although bee packages can be a more affordable option, buying a 5 Frame Nuc is our recommendation because it lowers the risk of swarming and gives your bees the best head start.
When it comes to buying your bees, try to get them from a local beekeeper who has overwintered the queens.
Good luck to you all!
Keep On Beekeeping On!
-Lane