
So you're thinking about becoming a beekeeper, are you?
Maybe you want to save the bees. Maybe you dream of selling honey. Or maybe it just brings back fond memories of grandpa on the farm. Everyone who comes to this site has caught the buzz at some point or another.
But what do you do with it? What kind of beehive should you get? What are you even looking for?
If you're looking at an online beehive kit like it's algebra, then reading this article will be a perfect guide to get you comfortable with how a beehive works.
This article explains all the ins and outs of every part of a beehive with great detail. It'll explain what the pieces are, what they're called, what their purpose is, what features you'll want to look for, how they work with the rest of the hive, how some of the experts use them and of course, some secret tricks you wouldn't find anywhere else but here.
If on the other hand, you're somewhat familiar with the parts of a beehive then you may just want a quick explanation of one or two pieces. If this is you, then click on the diagram below to enlarge it. The diagram should help you identify your problem piece. After identifying it, you can read more about it below or just hop on over to our other article: How Do I Assemble My Beehive? (Click Here)

Table of Contents (Click to Skip Around)
Telescoping Top Cover

At the top of this list and the top of your hive is the telescoping top cover.
It's the first line of defense between your colony and your climate.
Telescoping top covers are capped with a highly rust resistant metal and aren't effected by the rain, sleet or snow.
Made from solid wood, these covers will have a long and durable life.
Beekeepers use the word telescoping to describe the way that the two inch tall sides of this cover act as weather guards. When placed on the hive the sides envelop both the inner cover and the crown of your first medium super. By surrounding this area with a two inch ledge of wood, the weather falls to the ground instead of into your hive.
This ledge also provides an easy way to grab onto the cover when you're looking for leverage to remove it for hive inspections.
Here's a Pro Tip!
When inspecting your hive, the first cover to come off is the telescoping top cover. Once you've removed it, an additional benefit to this part is found by setting the cover on the ground with the metal side down. Doing so allows you to have a place to safely stack your bee boxes & hive bodies. Instead of putting the boxes directly on the ground, you can set them at an angle in relation to the ledges. This lets the frames hang freely over the cover and results in a cleaner inspection. It will also minimize the number of bees that are harmed and other damages.
Inner Cover

The next hive part on the list is called the inner cover.
The inner cover is a dividing layer between the telescoping top cover and the frames full of bees below.
At first glance, inner covers may seem as one of the more insignificant parts of a beehive. On the contrary, the inner cover is an unsung hero of the hive and has a multitude of hidden purposes. Let's go through some of them here.
Feeding Within the Hive
One of the most useful benefits of the inner cover is that the cut out hole in the middle can be used to feed your bees. By sitting a mason jar full of sugar syrup on the inner cover your bees have a direct line to artificial nectar. Bees can use this artificial nectar to help them build up their honey comb and as an ingredient in the food they feed their larva.
You don't always have to feed your bees, but you should for the first few months. When your bees first arrive, they don't know where they can get food. They haven't dialed into their surroundings yet. So to give them the best head start, you should feed them sugar water. To learn all about this sugar syrup you can visit: The Ultimate Guide to Feeding Bees Sugar Water (How to Make it & More).
To use the inner cover for feeding, place it directly above your highest hive body. Then place another bee box without frames on top of the inner cover. See picture. The mason jar should have a lid with a couple nail sized holes in it. Flip the jar upside down and it will slowly drip into the hive. Once the mason jar is flipped you can set the telescoping top cover on to the frameless box.

The Busy Bees 'N' More inner cover has a circular cut out in the middle. The size of this circle has the same measurements as a mason jar. Allowing you to insert it through the hole and keep it held straight up.
Ventilation & Top Entrance
The Busy Bees 'N' More inner cover also has a little notch cut out on the brim. This notch serves a dual purpose.
In the summer time you can face the notched side up creating a "u" shape. This position makes a top entrance where bees can easily walk into the hive and onto the inner cover. This gives your honeybees a direct route to the inner cover's center cut out at the top of the hive. Bypassing many of the obstacles that they'd encounter on the way to their desired frame - which makes them more productive.

In the winter months, the bees will stop collecting resources and slow down their comb making. To help prep for winter, you can flip your inner cover over to create an "n" shape with the notch. When the notch is facing down like this, it is ventilating the moisture out of your hive. Moisture can be a huge problem and is one of the leading causes of bee death during winter.
When your hive has this notch facing down, the moisture has somewhere to go. It now rolls out of the hive through the notch instead of collecting at the top of your hive.
Here's a Pro Tip!
If you're looking to buy a beehive, the notch in an inner cover is a nice feature to have, but it's not a deal breaker if it doesn't come with one. If your inner cover doesn't have this notch and you desire one, you have a few options:
- Cut a notch using a small keyhole saw or pocket knife. The notch should be at the front of the hive. Cut it about an inch wide in the center of the inner cover's brim. Make sure the cut is on the deep side's (3/8" side) brim all the way down to the center board
- Purchase a Busy Bees 'N' More Inner Cover to go on your hive. Every hive part from Galena Farm's brands are cut to the industries' standard dimensions. This means that all of our hive parts are interchangeable between any other brand on the market
- Use the Popsicle Stick Method. To do this method, you'll line the inner cover's brim with popsicle sticks - remember to leave a space for the notch. Stack these popsicle sticks 3 high and screw them into the brim. This method creates a notch in any inner cover that will ventilate your heat and humidity in the winter and add a top entrance in the summer. You can also remove the screws and popsicle sticks any time you'd like
Evacuating Bees
Galena Farm's NuBee and Hoover Hives can both use an Oval Bee Escape.
The Oval Bee Escape is an accessory that fits into the oval cut out of your beehive's inner cover. It is used to expel bees from certain areas of your hive. In most cases, beekeepers use them to vacate the medium super boxes before harvesting them.
Traditionally, beekeepers would just use bee brushes to sweep the bees off of the frames. Unfortunately, brushing bees can be harmful to them and may even kill the queen. Using an Oval Bee Escape is a safe and easy alternative for vacating your bee boxes.
The technology behind it uses a couple springs to create a one way exit. The bees can leave the upper boxes, but once they've descended down through the oval bee escape, the springs prevent them from going back up.
Galena Farms includes one of these as a free gift with each NuBee and Hoover Hives kit we sell. To learn more about the Oval Bee Escape, check out our article: How Do I Use an Oval Bee Escape?

Cleaner Inspections
You should also seek an inner cover that has two different depths on each side. One side is shallow/flush and the other side is 3/8" deep. The different depths have different purposes.
During the spring and summer the shallow/flush side should be facing down towards the frames. This helps prevent the bees from connecting the inner cover to the frames with burr comb. Burr comb is just what beekeepers call beeswax that is placed anywhere else other than where it should be - on the frames.
Bees have a habit of building burr comb anywhere they think has too much space. By putting the shallow/flush side down in the spring and summer, it limits the amount of space they have between the inner cover and frames during the bees' peak wax building season.
Insulation
During the winter, the 3/8" deep side can face down towards the frames. This will create some extra loft that will collect heat underneath the inner cover.
At the same time, the inner cover also creates a second layer at the top of your hive with a small amount of dead space between the telescoping top cover. This works similarly to double pane windows to keep the heat in and soften the blow of winter.
Smoke/Peep Hole

The inner cover's cut out hole can be used to check on your bees with the least amount of disturbance to the hive. This can be useful when it's late February or early March and you want to do a quick check on your hive. At this time of year, it's still too cold outside to do a full inspection. So instead of having to crack open the inner cover and release all the heat, you can just look through the cut out.
You can also use the cut out in the inner cover as a place to point the nose of your smoker. This can prepare and calm your hive for inspection before you disturb them. With the inner cover still on, you can smoke the whole hive in just a couple puffs.
Hive Bodies & Bee Boxes
One of the most intimidating decisions you'll make as a beekeeper happens when you're choosing your initial set up. At this point, you'll have to estimate how many bee boxes you think you'll need and decide whether you want to use mediums, deeps, or a combination of both. There are quite a few configurations and the differences may be confusing, especially if this is your first beehive. Luckily, you can always purchase more or different boxes later on. Although, the best bundled deal happens when you buy at the same time.
From the bees' perspective, they don't seem to mind what configuration you choose. From the beekeeper's perspective though, the set up you choose can have a variety of effects ranging from the amount of brood you have, the amount of honey that is made, the health of the hive, the ease it is to inspect your hive, the amount of equipment you have, how well they can survive through the winter and more.
So let's break this crucial question down a bit and figure out what's so important about this part of a beehive.
Medium Supers

Medium supers are placed near the top of the hive, just below the covers, but above everything else.
When you're adding on one of these bee boxes to your hive, the general rule of thumb is to make sure that all of your other boxes are at least 60% full. If you add boxes too quickly to your hive, it can cause some issues. To name a few, your bees can end up with a lack of focus, slower productivity, gnawing away the beeswax on the foundations, and it can make them more vulnerable to predators or being robbed by other bees.
Here's a Pro Tip!
Many beekeepers believe that this 60% rule is a hard and fast rule to live by.
Others believe supering your hive is more like an art form than a science. Here's a video from UoG Honey Bee Research Centre that helps explain the art form behind interpreting when your hive needs another medium super.
However you decide to add boxes, you'll still want to start your hive off with just one deep brood box. Later on in the year, you'll add on boxes as your hive grows. But for now, just set the boxes you bought in the bundled price aside until the bees are ready for you to add them. You don't want to overwhelm them with a home that is too big for them to handle.
Purpose
If you've never owned a hive, it's pretty easy to see why someone might think that there's only one difference between a medium super and a deep brood box - it's size. Medium supers are, in fact, 3" shorter than their brood box counterparts. While that doesn't seem like much, it can make a world of difference.
By cutting off 3" from a deep brood box, medium supers can cut down on the chance of injury. Medium supers are 30% lighter than deep hive bodies. This is a significant difference when we're talking about how a deep brood box can weigh up to 90 lb when they're full of honey. In contrast, a medium super weighs about 60 lb when they're full.
Typically you don't realize how heavy honey is until you're actually handling it. In the long run, these weight savings can help save your back and your joints.
Some beekeepers take this weight saving idea and go even further by using 8 frame equipment to make a hive instead of the standard 10 frame. This can shave off another 20% from the weight of each box. To read more about 8 frame beehives, check out our article: 7 Benefits of 8 Frame Beehives (Click Here).
Since the bees don't seem to mind the difference of what you choose, you can even make a whole hive out of just medium bee boxes. Doing this means that all of your boxes and frames would be the same. This interchangeability makes managing an inventory a breeze. If a part of a beehive happens to break, you'd know for sure that you'd have a replacement part for it ready to go.
The downfall of a hive with all medium boxes is that you're going to need more boxes because they fill up quicker. It can also take longer to inspect an all medium super hive that has more frames. Even still, it's a trade off that many beekeepers make to save them from the heavy lifting.
Here's a Pro Tip!

Keep in mind that while someone in the North may normally need 2 deep brood boxes for the brood chamber, you would need 3 medium supers to equate to the same amount of volume.
This means that our best selling hive, the 2 Deep 1 Medium hive, would have the same volume as a 0 deep 4 medium hive.
The Names
Medium supers are called supers because the name harkens back to the Latin word for "above". Which makes a lot of sense because as your hive bodies fill up with honey and brood, you'll add more supers above them for the bees to grow into.
Medium supers have many names. As your scouring the internet for information I want to make it clear that you'll run into quite a few different terms for this one box.
Here are some of the terms that all mean the same thing:
- Mediums
- Medium Bee Boxes
- Medium Honey Supers
- Illinois Supers
- 6 5/8s
- Western Supers
- Semi-Deeps
- Medium Hive Bodies
- Medium Hive Boxes
- Langstroth Mediums
- Super Boxes
- Medium Body
- Honey Chambers
- 3/4 Deeps
- Honey Boxes
Brood Boxes

Deep brood boxes are usually sitting directly above the bottom board, but underneath the medium supers or queen excluder. Deep boxes were designed to give your queen an ample amount of space to lay eggs and raise brood.
Most beekeepers tend to have at least one brood box and often times have two depending on where they live in the United States.
Here's a Pro Tip!
If you live in the North (zones 3-6) we recommend you use two brood boxes in your set up. See picture below.
The North has longer winters, which means a longer wait till it's warm enough outside to inspect the hive. When you can't open the hive, you don't know how large your colony is. Your colony may grow too large for their home before you get a chance to give them more room. The timing on this is crucial. If you're late, half the hive may swarm before you can add on another bee box. By keeping a second brood box on your hive through winter, there's a better chance all your bees will still be there when you finally get to open the hive.
Using two brood boxes also gives your bees more honey storage for the longer winters. This is important because the food they have in the hive has to last till the pollen flow starts up later on in the year.

In the South (zones 7-10) you can get by with a single brood box. The South doesn't have to worry as much about winter. There's plenty of pollen and nectar almost all year round. You can also inspect the hive earlier in the year. This leads to very little need to have a second brood box on the hive through winter. You can simply add the box during your first inspection of the year if necessary.
Purpose
There's a debate going on between beekeepers on if brood boxes are important or not.
A small portion of beeks say that using a brood box is no better or worse than using medium boxes. Their reasoning is that the queen can only lay so many eggs per day so how would 3 more inches of frame space matter?
Most beeks on the other hand, believe that using a deep brood box can increase your population more quickly than a hive full of mediums can. Their reasoning is that 3 more inches of frame space allows for more continuous space for the queen to lay her eggs. This means less time looking for her next spot to lay and more time actually laying them.
Having more brood would be desirable. It would result in a higher production rate for honey. It would also develop a healthier hive that can guard against robber bees and Small Hive Beetles (a common pest among bees).
The Names
Unlike medium supers, the brood box's name is pretty straight forward. The various names that beekeepers call brood boxes are more centralized than the wide variety of names you hear mediums supers called. Even still, you might come across a few different ones while you're reading forums and beekeeping books.
Here are some of the terms that all mean the same thing:
- Deeps
- Deep Bee Boxes
- Deep Brood Box
- Langstroth Brood Box
- Deep Broods
- Deep Hive Bodies
- Deep Hive Boxes
- Langstroth Deeps
- Brood Boxes
- Hive Bodies
- Brood Chambers
- Bee Brood Box
Frames & Foundations

Not too long ago, beekeepers would have to completely destroy the comb within a hive to be able to reap the honey. This would often times kill the colony, but now, thanks to the genius of Reverend Langstroth, we've had a solution since 1852. He invented America's favorite hive along with the removable frames that we still use to this day.
The frames he designed are used to keep the comb organized within the hive bodies.
Each wooden frame is made of 4 pieces comprising of two side bars, a top rail, and a bottom rail. They fit together to form a rectangle and can be bonded using wood glue and/or nails. Either will do, but we recommend using both nails & glue for extra strength.
As you can see in the picture above, the main difference between a deep frame and a medium frame is the length of the side bars. The top and bottom rails are interchangeable between medium and deep frames.
The flat plastic pieces that have hexagon cells imprinted on them are called Foundations. Foundations are used as a guide for the bees to quickly build comb on. It provides support to the honeycomb that makes inspection easier for you and safer for the bees. While inspecting a hive, it is not uncommon to flip a frame upside down and back and forth. Doing so without support from foundations may cause the comb to fall out or be destroyed.
Something special about every Galena Farms beehive is that they come with CellTech frames and foundations.
CellTech's foundations are made from food grade plastic. This high grade material helps hold every floral note that your honey was intended to have without imparting the tastes that other plastics can give off. Every CellTech foundation has been dipped in 100% natural beeswax to coat the plastic cells. Dipping the foundations in beeswax entices honey bees to create an even layer of comb across the entire foundation.
The medium sized CellTech foundations are natural honey colored to help you spot any debris that may need to be filtered out. The deep sized CellTech foundations are black so that it makes inspecting white brood eggs easier to do against the dark background.

CellTech wooden frames are lightweight and made from Pine that has been responsibly sourced from the forests of New Zealand. This pine quickly regrows in New Zealand’s fertile soil. It has a grain flow that handles the meticulous cuts that are necessary for the grooves that hold the foundations.
Queen Excluder

Queen Excluders can be a very useful tool in a beekeeper's arsenal.
Essentially, they are grid screens made of either plastic or metal that have gaps. These gaps are large enough for the worker bees to pass through, but small enough that the queen's enlarged abdomen cannot.
Using a queen excluder prevents your queen from going into places that you don't want her to. Most people use them when they are trying to keep her in the deep brood boxes and out of the medium honey supers. If you don't use a queen excluder, you may find your queen roaming in the upper boxes and laying eggs next to the honey. You will have to allow these eggs to hatch before you harvest or your honey will be tainted.
Even once you allow the eggs on a honey frame to hatch, the postnatal cocoons will acquire a dark brown tint from a variety of things. This includes a combination of remnants from the egg and debris that has entered the hive (usually dirt tracked in by the bees’ feet).
The tastiest and most pure honey comes from frames that have never had brood in them. The best way to guarantee that your queen won’t lay eggs in your honey frames is by making these frames inaccessible to her using a queen excluder.
While queen excluders can serve an important purpose, some beekeepers don't like using them. The controversy here is based on how queen excluders have a tendency to also exclude worker bees from the top parts of the hive. This has lead some beekeepers to not-so-jokingly call them honey excluders. For other beekeepers with smaller bees, they work really well, for others. It's up to you to decide if a queen excluder is right for you & your hive.
Here's a Pro Tip!
The queen excluder normally separates your top brood box and your bottom medium super. However, there is a second way to use this part of a beehive though. The following technique will prevent your bees from swarming away when you first get them. It is supposed to be temporary and only used while your new bees are getting cozy in their new home.
This technique should be done before putting your bees in the hive. To do it, you'll want to put the queen excluder at the bottom of your hive below their brood box, but above the bottom board/entrance reducer (see picture). Putting a queen excluder here allows the worker bees to exit the hive, but contains your queen inside the brood box.
If you have a top entrance in your hive, you'll want to temporarily close this off too.
This technique prevents your bees from absconding (immediately abandoning the hive) because the queen can't exit the hive and the colony won't leave without her.
In a few days, your queen will start laying eggs on the deep frames' foundations. Once she's laying eggs, you'll know that the colony has accepted their new home and that they're there to stay. After finding eggs, you can remove the queen excluder from this position.
Bottom Boards
The last few essential parts of a beehive are the bottom boards, entrance reducers, and the mouse guards.
Located below the hive bodies, the bottom board bears the burden of the entire weight of your hive. It's also the last line of defense between your frames and the open world of Small Hive Beetles, Varroa Mites, skunks, raccoons and a variety of other dangerous predators.
Bottom boards come in two different styles - the solid bottom board and the screened bottom board. Both types of boards have multiple useful purposes and can be switched back and forth depending on the season.
The entrance reducers and mouse guards can be used to help control what goes in and out of your hive. This will also change depending on the season and what you're doing with your hive.
Solid Bottom Boards

The solid bottom board comes standard with every NuBee and Hoover Hives kit. They sit just below your bottom brood box and above your hive stand. These solid bottom boards have been designed in a special way that gives you two different functions. Much like the inner cover, there is both a shallow and a deep side to them.
The deep side is 3/4" deep. When it's facing upwards it can be used along with the entrance reducer to help protect your hive from other bees and pests.
The shallow side is 3/8" deep. When it's facing upwards it becomes a natural mouse deterrent. The 3/8" bee space is large enough for the bees to go in and out of the hive, but short enough that mice can't. Mice aren't often a problem, but if you live near an open field, it's nice to have this option available.
Many beekeepers believe that their hives should be as similar as possible to a bee's natural habitat. The number one dream home of a bee colony is within the hollow of a large tree. Once the bees have moved in, they immediately start sealing up the holes and cracks with propolis and wax. They do this throughout the entire cavity so that they can have better control of the micro-climate inside.

The beekeepers trying to mimic this natural habitat tend to use a solid bottom board. The solid bottoms give your bees better control of the moisture, heat, and air circulation in their hive.
Solid bottom boards also help keep the heat in during winter. This extra heat can lead to an earlier brood production after winter and gives your hive a head start to spring.
A solid bottom board can lead to better communication in the hive because the pheromones aren't seeping out the cracks. There are 15 or so different pheromones that your bees use to communicate with each other. These pheromones hive a wide range of uses including a pheromone to alarm the colony of danger, one to tell the worker bees they need a new queen and another to inform bees it's time to forage.
Ultimately, we recommend that every beekeeper have a solid bottom board in their arsenal. The solid bottoms are especially useful for the cold seasons. With very few openings, they easily keep the blizzardous windchills of winter out of the hive.
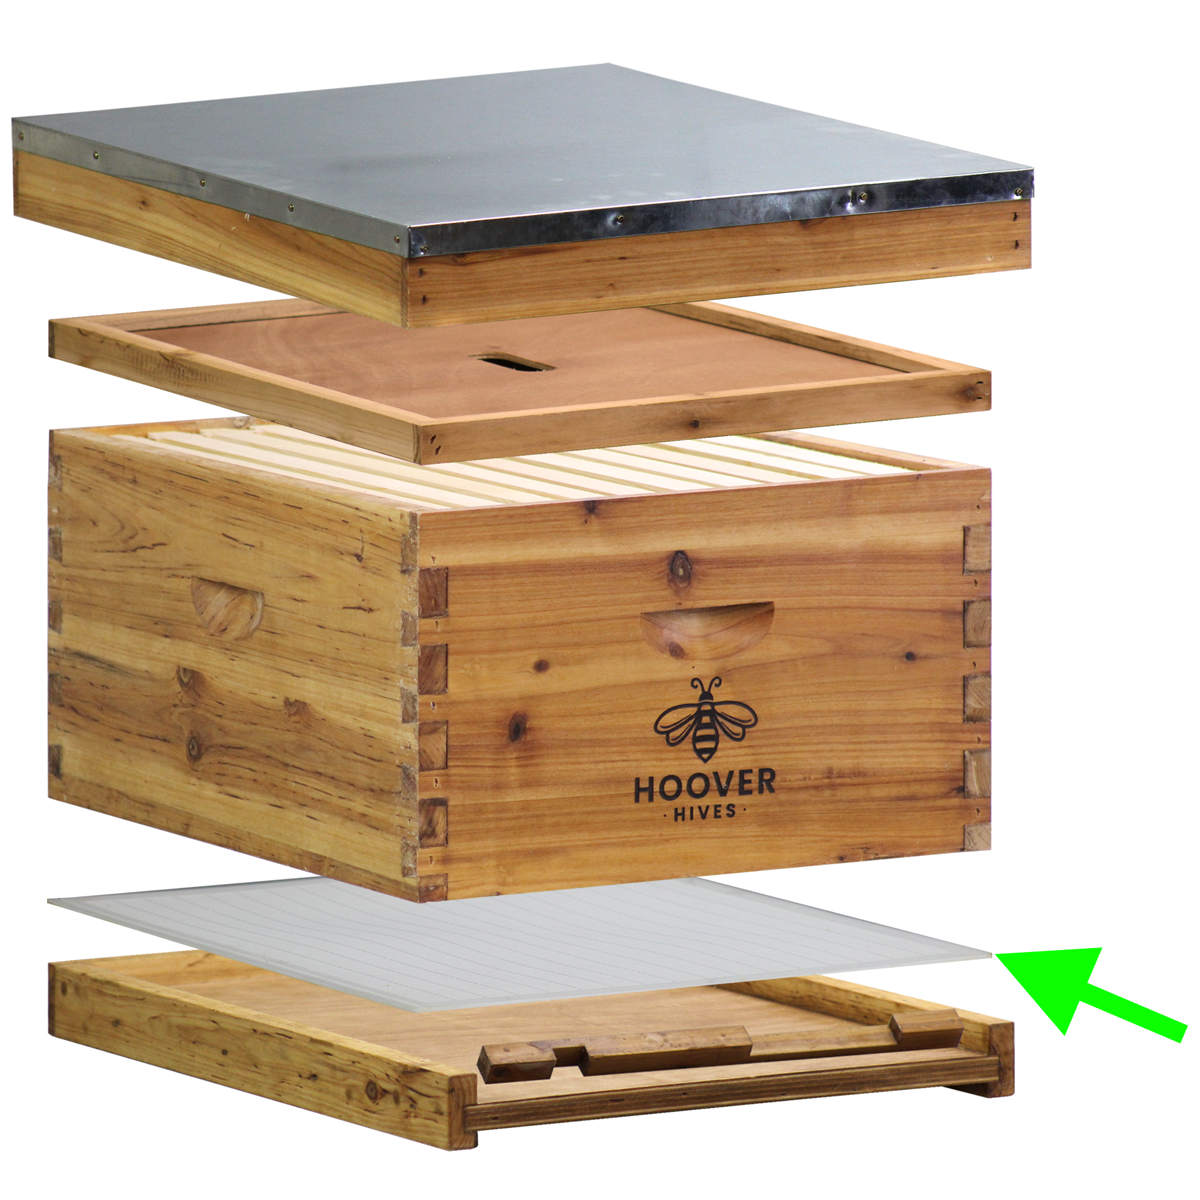
Screened Bottom Boards

The other type of well known bottom board is called a screened bottom board. Screened bottom boards have a floor that is made of tightly woven metal and come standard on a Busy Bees 'N' More hive kit.
These kind of boards help create ventilation and limit the moisture inside your hive. This can be great if you live in the south where the climate is hotter. It can be very similar to opening a window in your house on a hot day to welcome a cool summer breeze.
The screened bottom board might be a good fit for you if you live in zone 7-10. Although, if you live in a desert like region, you may want to ask a local beekeeper for their advice. Using a screened bottom board in an arid place can leave your bees too dry and unable to produce brood.
Here's a Pro Tip!
On the backside of the hive there's a place to insert the long plastic board that came with your hive. This long plastic board can be used to catch and count Varroa Mites that fall from your hive.
Varroa Mites are like ticks on a dog, they are a parasite that live and feed on bees. They don't have wings so they can't fly. Once they've fallen through the screen they won't be able to get back up to where your bees are. The screen size is large enough the Varroa Mites will fall through, but small enough that the bees can't.

Try rubbing a little coconut oil, Crisco or Pam on to the plastic board below the screen mesh. Doin so will have the Varroa Mite and Small Hive Beetles (SHB) stick to it. This allows you to count the mite drop rate and keep surveillance on how many pests you have in your hive.
Below the screen is a slide in plastic board that will catch the Varroa Mites that fall. On this platform you can smear a little coconut oil, Crisco, or spray some pam on it. Doing so will have the Varroa Mite and Small Hive Beetles (SHB) stick to it. This allows you to count the mite drop rate and keep surveillance on how many pests you have in your hive.
Entrance Reducer

Every Galena Farms hive kit comes with a wooden entrance reducer. This hive part is designed to defend your young colony from intruders like wasps, hornets and other bees that are trying to steal an easy meal.
To use this item you'll place it at the front of your hive pinched between the bottom board and the brim of the bottom brood box. The multiple notches in the entrance reducer allow you to adjust the size of the opening.
At the beginning of the year your bees are the weakest and most vulnerable they'll every be. At this time of year, you'll want to set the entrance reducer to the smallest opening.
As the year goes on your colony will grow stronger. You can then rotate the entrance reducer to have a larger opening.
Later in the year your bees will be fully capable of defending themselves. When this happens, you can remove the entrance reducer completely. This will allow your hive to have unrestricted access to the entrance.
Mouse Guard
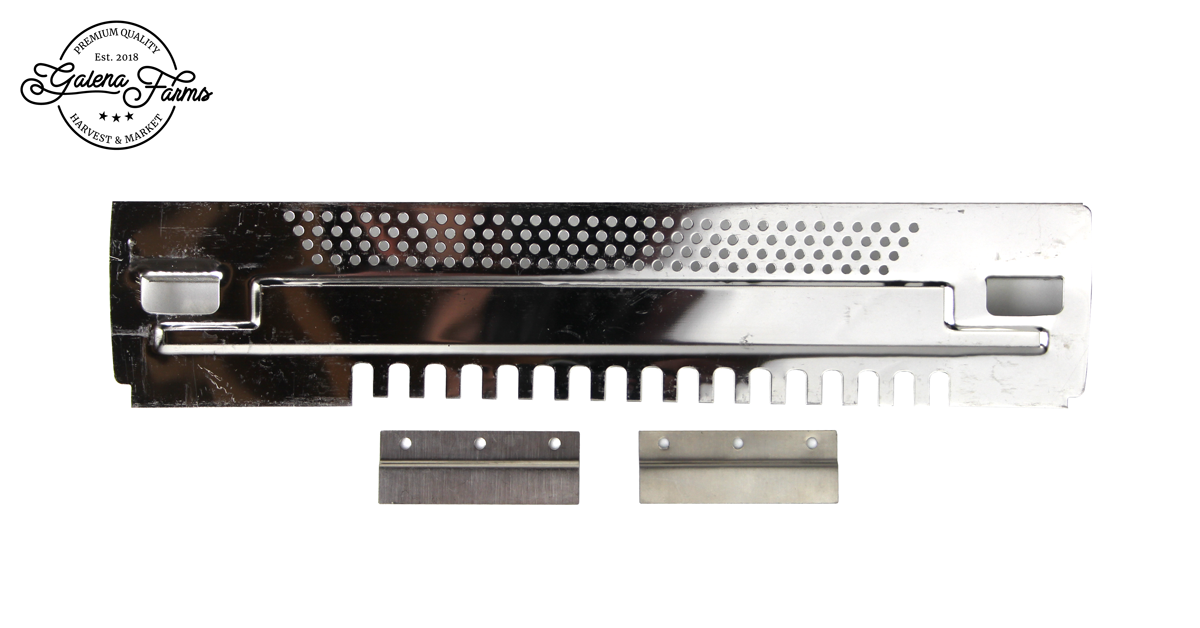
Mouse guards are included in Hoover Hives and NuBee hive kits.
One of the main features of using a mouse guard like this is that it is made from metal. While beekeepers sometimes find their wooden entrance reducers chewed through, the mice cannot chew through a metal mouse guard.
Much like an entrance reducer, mouse guards fit over the entrance of your hive to help defend your bees. The mouse guard should be installed as winter approaches. During this time mice are looking for a place to stay through the cold months. Mice love to live in beehives because not only do they have access to free food, but they also use the heat from the bees as a miniature furnace. To learn more about what bees do in winter, how they stay warm and how to prepare your hive check out our other article: The Ultimate Guide to Winterizing Your Bees.
Like many parts of a beehive, the mouse guard also has two functions. On one side, there are a bunch of small holes that will keep the hive ventilated, but prevent the bees from passing through. This is a great setting if you're moving your hive from one area to another. Another reason for this is if you just installed a new package of bees and you want to make sure they start laying eggs there.
On the other side, you'll find a series of small "n" shaped cut outs. These holes are large enough for the bees to go in and out of your hive, but there's no chance a mouse could.
To install, just face the bended tabs away from the hive and use the 2 small nail plates to hold up the mouse guard. The leftover nails from when you assembled your hive bodies will work on these nail plates.
Accessories
Accessories aren't exactly parts of a beehive, but you're going to want a few of them anyways. They have a wide range of purposes from calming your bees, opening the hive, breaking through propolis, keeping your bees safe, and protecting the wood of your hive.
There is a whole world of beekeeping related accessories out there. In fact, that is something that most beekeepers, including myself love about the hobby. It doesn't take long to run into a new invention or someone tinkering with new a technique. Usually if their solution works in multiple areas of the world, it will start being sold on the market.
Here's a list of accessories you'll want for you first year of beekeeping.
Hive Stand

Whether you build your own hive stand or buy one from us, you're going to want to keep your bees off the ground. The ground can degrade wood very quickly. Raising it up a little bit allows for air to pass underneath and provides some much needed ventilation to keep the wood dry.
Lifting your hive off the ground also prevents small pests from walking into your hive. Ants love the taste of honey and beekeepers go through great lengths to stop them from finding their way into the hive. I've seen cinnamon dusting to overpower their scent trails, hive stands with their feet in cans of cooking oil to create a "moat" around the "castle", and of course a number of special powders and chemicals on the market. Without a hive stand, you're just making their job easier.
Another reason you'll want a hive stand is to protect your hive from natural predators like skunks, raccoons and opossums. By raising it off the ground, these critters will have to stand on their hind legs to reach into your hive. Once their on their hind legs the animal's belly is exposed. Believe me, your bees know exactly how to find a good spot to sting and the belly of an animal is prime fur-less real estate. For more on this topic you can check out our article: 10 Factors When Considering Where to Place a Beehive.
The hive stand that we sell has a built in rack to hold your frames. This is a fantastic feature because while you're inspecting frames, you'll have somewhere to put them. Other wise, you end up laying frames on the ground which can render them dirty and vulnerable to pests.
Smoker

The reason beekeepers use smoke is twofold. One reason is because it disguises the alarm pheromones that bees release to warn one another of uninvited guests. The second reason is that smoke encourages bees to gorge themselves on as much honey as they can. They do this because they know the old adage that when there's smoke there's fire. And if there's fire, then they need to eat as much honey as they can just in case they have to abandon the hive.
Since as early as 3500 BC history shows us that the Egyptians used smoke to calm and distract bees. Back then they wafted and fanned smoke from incense towards the hives general direction. In modern times we've perfected the bee smoker to push and puff smoke in whatever direction we'd like.
The circular base plate fits inside the smoker and has 3 tabs that should be bent to create loft and foster consistent air flow. It also has multiple holes in it to help vent the smoke up through the nose of the smoker.
Most beekeepers find bee smokers like this to be an essential tool in their arsenal. Although, it is possible that you'll run across a small group of daredevils that would rather take their chances without one.
Here's a Pro Tip!
When you're choosing a fuel for your smoker it's best practice to use a combustible that won't let off a strong smell. Although it may be tempting to use hardwood, it'd be best if you didn't. Much like a good barbeque, hardwood will add a smoked flavor to your honey. Unfortunately, when it comes to honey, this is very off putting. It is as difficult to sell as it is to digest.
Instead of hardwood, a favorite fuel among beekeepers is to use pine needles (not spruce needles). Pine needles are highly accessible in many parts of the world. They're likely already in your own backyard somewhere along the property line. If you don't have any pine trees though, you can stock up on this fuel from Amazon.

Hive Tool

An essential multipurpose hive tool that every beekeeper uses is the hive tool.
This tool is the Swiss Army Knife of beekeeping equipment. You can use it for practically anything and everything.
On the flat side of the hive tool, you can scrape unwanted burr comb and pry your boxes apart.
On the curled side, you can use the tool to help pick up frames and get extra leverage when necessary.
The cut-out in the middle of the hive tool allows you to pry a nail from your boxes or hang the tool in your shed/garage.
There are many types of hive tools on the market, some more elaborate than others. Ours focuses on the essentials and has everything you need to do a complete a hive inspection.
Outerwear
You've likely seen on YouTube or at your local bee clubs that there are many experienced beekeepers that don't feel the need to wear a jacket, veil, or gloves. Although it looks great on camera, not everyone is daring enough to try this, especially in their first year of beekeeping.
Although, these accessories may not be seen as essential parts of a beehive, they are essential outerwear for a new beekeeper. Let's go through a few of the features that you'll want to seek out when buying these accessories.
Jacket

One of the main features you'll want to look for in a bee suit is breathability. Beekeeping is an outdoor hobby and most of the heavy lifting is done in the late spring and throughout the summer. You're going to want a jacket that has found the fine balance between being light & airy while still being protective.
Another heat related factor is that you'll likely want a jacket, not a full suit. When it comes to what you can wear around the legs, a pair of blue jeans will do just fine. Denim does very well against bee stings. Also, it can be a hassle to have to step in and out of a suit, especially if you're wearing boots.
When it comes to how the jacket fits around the body. You'll want it loose around the body, but tight around the ends. Beekeeping jackets aren't exactly glamorous or fashionable. They don't need to be. They have one purpose, to help limit the number of stings you receive while beekeeping. The best way to do that is to stay away from ordering skin tight bee jackets. Tight clothing tends to fall onto your skin and can lead to bees finding a way to sting you through the jacket. We recommend that you shoot for a bee jacket that's 2 or more sizes larger than you're normal clothes. In the same vein we'd also recommend that your jacket have some type of cinching around the ends of the sleeve and waist line to help keep the bees out.
Veil

As far as veils go, you'll want it to have built in support arches that help it stand tall. One of the worst things that you can buy is a veil that lays flat on your head. This provides little (if any) protection at all. If you do have one that lays flat, we recommend you wear a baseball cap underneath the veil to give it some amount of loft. The veil we sell has these supports. See picture.
Your veil should have a cinched bottom or be able to attach to your jacket via zippers or Velcro. The veil from Galena Farms uses a combination of two zippers and Velcro to attach to the jacket. This covers all the gaps that the bees might try to find. The two zippers have large size loops that make the zippers extremely easy to use when you have your gloves on.
Another factor you can look for is to find a veil with high visibility. It can be difficult to see the little eggs in the cells, it's even more difficult if your veil is working against you too.
One last feature to seek out is a veil that has two layers instead of just one.
Gloves

There aren't really that many types of beekeeping gloves out on the market. You'll most commonly find ones made of sheepskin leather. This kind of leather is great because it's protective against bee stings and has some heat resistance for when you're dealing with your smoker.
You want to seek out gloves that are nimble so you can get down in between the frames. It's difficult to find gloves that have a balance between being nimble and still being protective though. Most beekeepers will get annoyed half way through the year with how clunky gloves feel in the hive. This is the reason why you often see beekeepers stop using their gloves long before they stop using their jacket or veil.
Lastly, if you can find gloves that go all the way up to the elbow and have a cinched in, that would be best.
Here's a Pro Tip!
Your outerwear is made to help limit the number of bee stings that will happen. I've never seen a jacket that claimed to be 100% sting free. That would be a hard promise to keep.
Certain species of bees are more aggressive than others and all species are effected by the heat of the summer. Unless you've been around a colony for a while it's hard to predict how aggressive they'll be. With good garments, the bees will try to sting you, but only end up stinging the jacket or gloves. When bees sting, they release a pheromone that can get stick inside of your outerwear. This pheromone will alarm bees to be more aggressive and likely to attack every time you come by. This is why it's important to wash your outerwear every now and then. Especially if your bees seem to be aggressive every time you come out to the bee yard.
In Conclusion
After reading this article, you can now see how every part of your beehive is an important piece to the puzzle. Many parts have multiple purposes if you know how to use them. Even the smallest and seemingly insignificant parts can be more useful than you'd think.
I hope you now feel more comfortable and confident with how a beehive works. That it's less like algebra and more like simple addition.
Below are some more articles to help you continue on your bee journey. They can help you find a good spot on your property for your hive(s), show you how to buy your bees and give you direction on assembling your new hive kit.
Good luck to you all!
Keep On Beekeeping On!
-Lane
Related Articles
The following articles could be very helpful on taking your next steps into your bee journey.


Recommended First Hives
If you haven't yet purchased your first hive, we recommend one of our Starter Hive Kits. Each kit comes with all the essential parts of a beehive and the accessories you'll need for your first few years of beekeeping. We consider them "Nuc Ready" which means they come with 5 frames and are ready for the 5 that you buy when you purchase a 5-Frame Nuc of bees
.


